

This blog post is written by Senior Applications Engineer, Ben MacDonald
Prototype overmolding are two words that when placed together make engineers cringe. Prototyping is supposed to be rapid, cheap, and full of iteration in the pursuit of a polished product. On the other hand, overmolding is slow, expensive, and exclusively for providing scale to production products. During the prototyping journey, engineers will do anything to avoid overmolding as it can become an insurmountable barrier to development. However, with new advancements in tooling the days of the overmolding dilemma are gone. Read on to find out how utilizing printed tooling, engineers can effectively add overmolding into their prototyping toolbox.
What is Overmolding?
Overmolding is a common use case of injection molding to create an assembly of two or more components. The two parts of an overmolded assembly are the substrate and the overmold, with the substrate being partially or fully encapsulated by the overmold. Typically the substrate is either a metal or a rigid polymer and the overmold is a softer material. Overmolding is used for a variety of reasons with the most common being to modify the functionality or aesthetics of a given part.
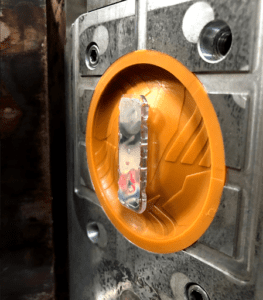
A 3D printed overmold in the mold frame on a 30-ton press used to prototype end caps for DeMarini baseball bats.
Common Overmolded Prototype Materials
Common overmolding materials span a wide range from very soft materials such as TPUs, TPEs, and Polypropylene, to very rigid materials such as PEEK, PEI, and ABS. The first main requirement for an overmold material is that it needs to be softer than the substrate. Thus there are countless combinations of substrates and overmolds that can be used. Typically when a softer overmold material is used the substrate is a thermoplastic and when a rigid overmold material is used the substrate is metal, but this isn’t always the case.
Whatever the combination of materials is, the second main requirement is that the two materials need to bond together. This is done in two main ways: chemical adhesion and mechanical interlocks. Certain overmold plastics naturally adhere very well to certain substrates, and in those instances that bond can hold the two parts together. In other instances, there is no natural adhesion between the two materials, and mechanical interlocks are added to the substrate to ensure that the two parts stay together.
Examples of Overmolded Prototypes
Overmolded prototypes span a variety of industries. Some examples of overmolded parts that could benefit from overmolded prototypes in the design phase include:
- Metal screwdriver with insulated handle to prevent electrical shocks
- Polycarbonate cell phone case with rubber shell for grip
- USB drive with overmolded shell for protection
- Metal surgical device with plastic grip for safety
- Automotive connector with overmolded gasket
The Prototype Overmolding Process Explained
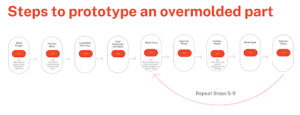
Chart showing the steps to prototype an overmolded part
- Mold Design
- Design the mold tool for the overmolded part, making sure that proper fixturing for the substrate is included so that the substrate doesn’t move during the full molding process.
- Procure mold
- Option 1: Traditional tooling, which involves cutting metal which can take weeks to months, and cost thousands to tens of thousands of dollars.
- Option 2: Utilize 3D printing. Print the full mold set on a FLUX ONE printer including the core and cavity blocks along with any required inserts, then secure the full mold set so that it is ready to be subject to the demands of overmolding.
- Load Mold into Press
- Insert the full mold set into the mold frame and load this frame onto the mold press.
- Load Substrate into Mold
- Place the substrate into the mold using the designated fixturing features to ensure that the substrate will not move. These fixtures may differ if this mold is being run on a horizontal or vertical press.
- Mold Close
- Start the mold cycle by closing the mold tool. Slow this process down on a horizontal machine to make sure that the substrate remains firmly in position during the closing process.
- Injection Phase
- With the mold tool fully closed the press will enter the injection phase where plastic is injected into the tool creating the overmolded part around the substrate.
- Cooling Phase
- With the injection phase complete the press will enter the cooling phase where the overmold is cooled down to the temperature at which the given material will maintain its rigidity.
- Mold Open
- The mold opens revealing a fully overmolded part attached to the “B” half of the mold set.
- Ejection Phase
- With the mold tool fully open the press will finally enter the ejection phase where the part will be pressed off of the “B” half using ejector pins or similar ejection components.
- Repeat steps 5-9
Pain Points in Prototype Overmolding
With the proper material selection and a well-defined process, it might seem like the idea of an overmolding dilemma is a little dramatic. For products that are well into production you would be right; at a production scale time and money are no longer barriers to entry. The real dilemma is getting an overmolded product to production scale. Previously there have been huge hurdles to getting overmolded products to production. These hurdles include cost and speed, and have made prototype overmolding nearly impossible.
Metal Tooling is Expensive
Fact: metal injection mold tools are expensive. Simple tools can cost thousands of dollars and more complex tools can cost tens of thousands of dollars. In production, this cost can be spread over thousands to hundreds of thousands of parts. When prototyping this cost is only spread over tens or hundreds of parts which, in most cases, isn’t justifiable. Usually, it makes more sense to change designs to accommodate a different manufacturing technology rather than use the optimal technology for the design. This often leads to issues down the road when transitioning to production. When the product hits production and is finally overmolded, issues will arise that could have been avoided if the product was properly prototyped in the first place. This is the essence of the overmolding dilemma.
Metal Tooling is Time Consuming
Hypothetically the cost of a metal injection mold tool might be justifiable. In that unlikely event once the lead time for such an undertaking is exposed the project surely will come to a complete halt. Lead times for mold tools (and molded parts) are notoriously long. Historically, y 4-6 weeks was the minimum lead time for a batch of molded parts. Today this is closer to 3-4 months. Waiting months to prototype simply isn’t an option when prototyping is all about moving quickly to get to the finished product. Speed to market is an extremely important factor in a product’s success and wasting time prototyping with a steel tool is a great way to give competitors an edge.
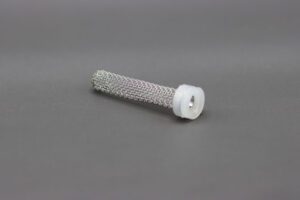
An overmolded part that utilized 3D printed mold tooling to beat cost and lead times with traditional tools.
Overmolding Can’t be Replicated with Direct 3D Printing
A traditional use case for 3D printing is to prototype injection molded parts. Oftentimes prototyping quantities are low and the value proposition just makes sense. For most parts, 3D printing can nail the form, fit, and function for small quantities, effectively doing the job of prototyping in a more efficient and cost-effective way. When it comes to overmolding this simply is not possible. No printing technology out there can pause mid-print, have another component placed onto the printer, and then print around that object for the rest of the print. No printer can effectively match the adhesion between two materials that is paramount to many overmolding products function. Quite simply, there is no substitute to properly replicate overmolding.
However, there is a way to leverage 3D printing and overmold prototype parts in an efficient and cost-effective manner. With 3D printed mold tools, you can quickly and cost-effectively procure a mold tool (the overmold and the substrate) to test in end-use material, allowing for validation before investing in production tooling.
See How Fortify Made a Filter Prototype with Overmolding and 3D Printing Technology
In this case study Fortify highlights how the days of not being able to prototype overmolded parts are over. When Fortify was in a pinch, they were able to use their printed molds to effectively prototype a filter for the Flux Series printers, saving them months in lead times and thousands of dollars. These filters were so successful that when it became time to put these filters into production Fortify made the easy choice to manufacture this component in-house! To learn more about how Fortify was able to leverage their own technology for their Flux Series printers, read the full case study here.
If you are already in a pinch, reach out to Fortify to see for yourself how quick and easy overmolding can really be!
